Watch Video Introduction: DTen/Zoom Room Introduction Training Video
The DTen D7 unit comes equipped with Zoom Rooms already installed. Zoom Rooms is a software-based room system that provides an integrated experience for audio conferencing, wireless screen sharing, and video conferencing. This article covers:
Powering on DTen D7 Unit
Main Menu Buttons
In-Meeting Controls
Participants List Controls as the Host
Invite participants
Invite By Contacts
Invite By Email
Record a meeting
Sharing Content
Whiteboarding
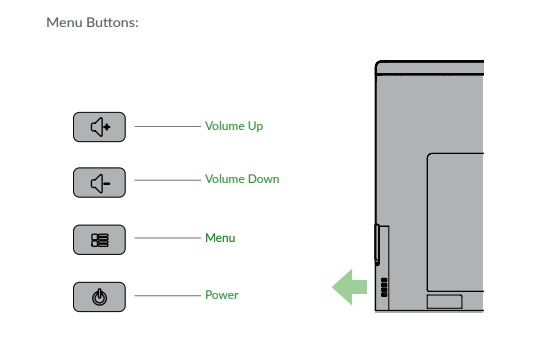
Powering on DTen D7 Unit
To power on the DTen D7 unit, press the power button located at the bottom right of the screen on the back of the monitor.
Main Menu Buttons
Below is an image of what the Zoom Rooms software will look like, as well as descriptions for each button. When you power on your DTen, Zoom Rooms will automatically start up and present you with a user menu with the following options:
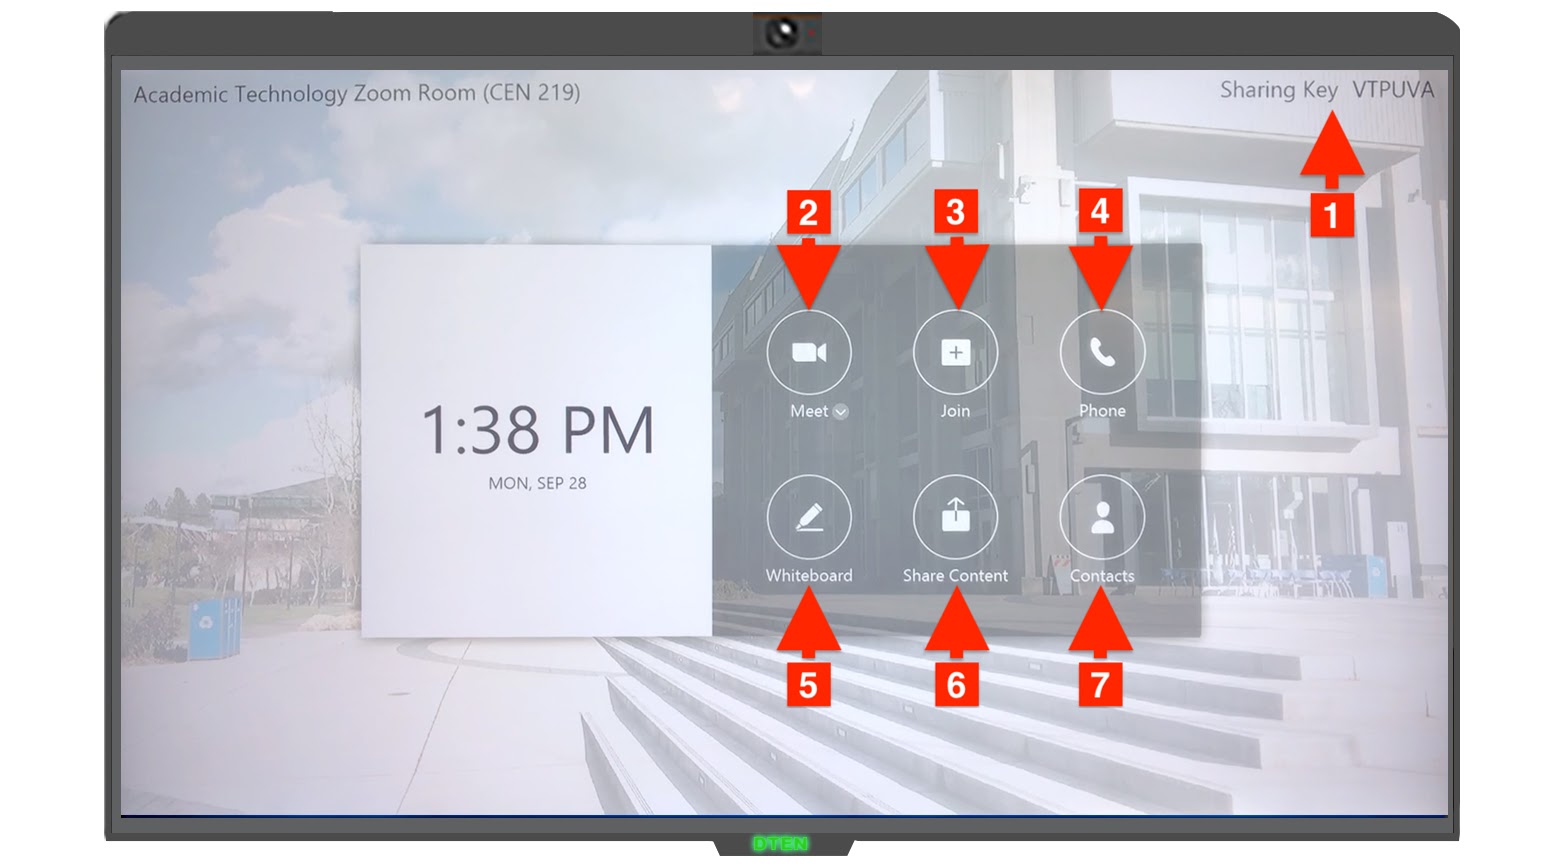
Sharing Key: Use this code to display content on the screen from your laptop or mobile device. See sharing content for more information.
Meet: Start an instant Zoom meeting. (Note: a random meeting ID will be generated)
Join: Join a scheduled Zoom meeting by meeting ID (recommended)
Phone: Make an audio phone call. *This is a paid feature that LCC does not use.
Whiteboard: Start a whiteboard session. See the Whiteboarding section for more details.
Share Content: Start a screen-sharing session from your laptop through the Zoom Client App. More information about this can be found in the Sharing Content section.
Contacts: Display the LCC internal Zoom contact list
In-Meeting Controls
Once in a Zoom meeting, touch anywhere on the screen to bring up the user interface in the lower half of the screen. Notice a control panel with the following in-meeting controls: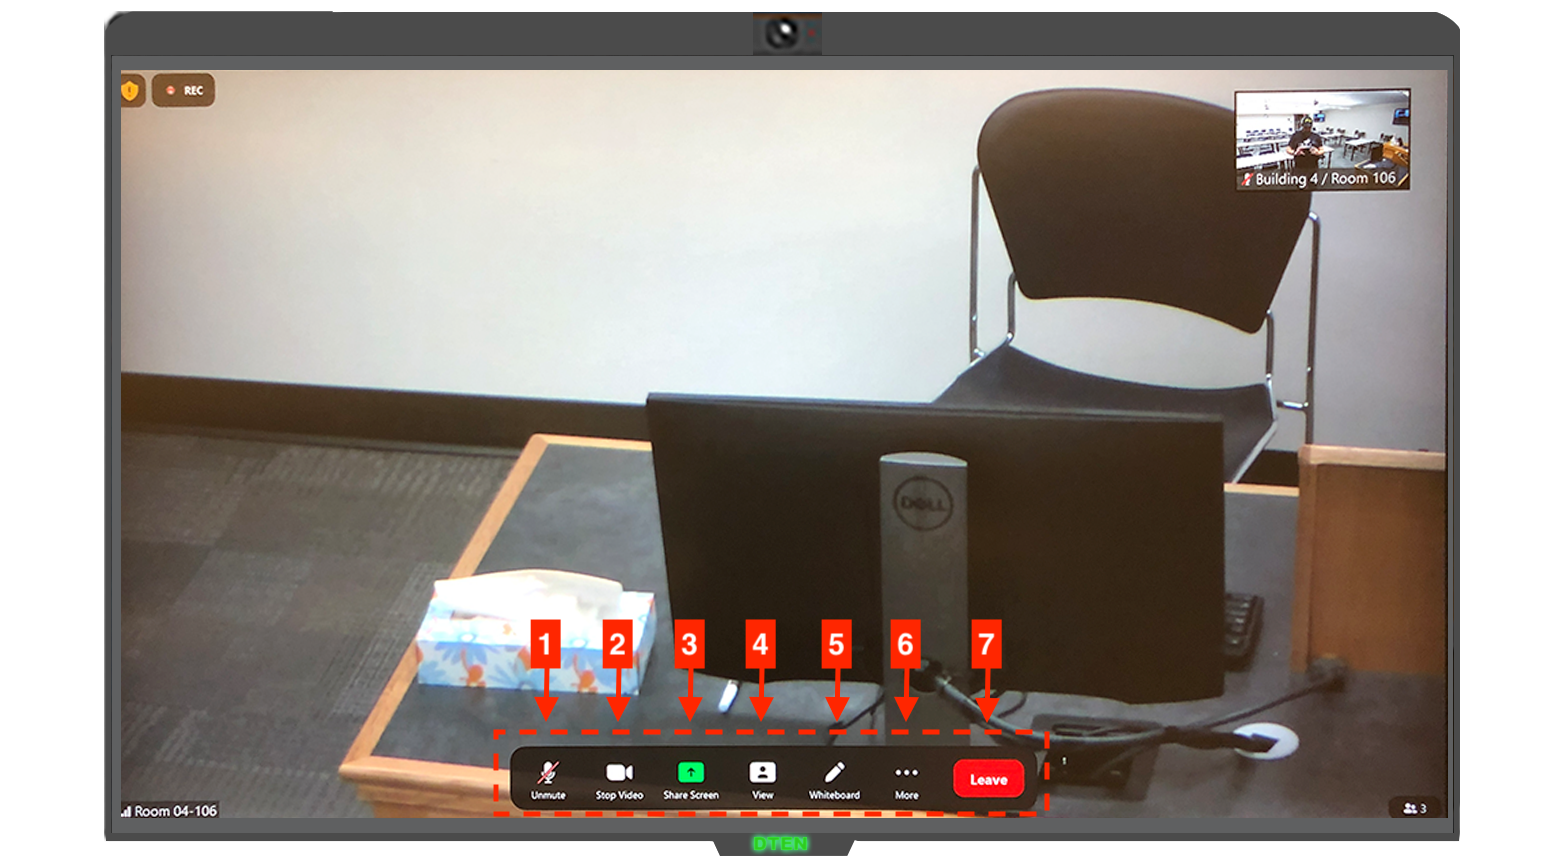
Unmute/Mute - Mute/unmute the DTEN microphone
Start/Stop Video - Start or stop the room's video camera.
Share Screen - Display instructions to share content from your laptop or mobile device.
View - Change your video display layout to one of these options.
Speaker: Display the video of the active speaker.
Thumbnail: Display the video of the active speaker. All other attendees are displayed with thumbnails below the active speaker.
Gallery: Display all attendees in a grid layout.
Whiteboard - Start and share a whiteboard session
More - security, camera control, participants, recording, settings, and volume
End/Leave - Leave or end the meeting
The “More” button opens up another panel with the following controls:

Raise Hand (Participant Only): Raises the hand icon
Security (Host Only): Change security settings: control participant access and enable/disable the waiting room
Camera Control: Change PTZ camera settings, presets, or switch to a secondary camera.
Manage Participants / Participants: View the meeting participants. If you're the host, you will see controls to manage participants.
Start Recording (Host Only): Start recording to the cloud.
Chat: Access to view messages in the chat.
Settings: Access room settings (Zoom Administrator Only).
Volume slider: Adjust the volume of the room's speaker.
Manage Participants as the Host
If you are the meeting host, tap Manage Participants in the meeting controls to access these features:

Tap the participant's name for these options:
Start or stop their video.
Pin or spotlight their video.
Allow them to record.
Make them host or co-host.
Put in the waiting room
Remove them from the meeting.
Invite: Invite users from your organization to the Zoom meeting
Mute All: Mutes all attendants. The room's microphone will remain on.
Unmute All: Unmutes all attendees.
Tap More for these options:
Lock Meeting: Don't allow other participants to join the meeting in progress.
Mute Participants on Entry: Automatically mute participants as they join the meeting.
Show/Hide Non-video Participants: Show or hide participant's name or profile picture on the Zoom Room's display if their video is turned off.
Show/Hide self view: Show or Hide your video feed on the Zoom Room's display. If the video is turned off, this will show or hide your name or profile picture.
Inviting Participants
Start or join a meeting from the Zoom Room Touch.
Tap More button in the meeting control panel.
Tap Manage Participants in the controls and select Invite.
Inviting By Email
Tap Invite by Email.
Tap the To box.
Type in the email address of the participant (if adding multiple separate the email address with a comma).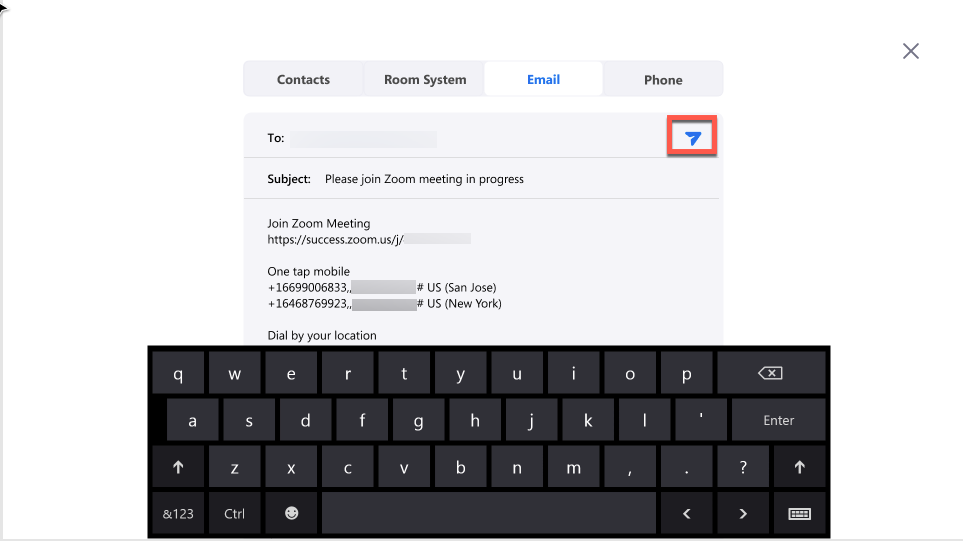
Click the send button.
Record a Meeting
Start or join a meeting from the Zoom Room Touch.
Touch anywhere on the screen to bring up the user interface in the lower half of the screen.
Touch the More button
Touch Start Recording.
The Send Recording dialog displays
Enter an email address to send the recording link to.
Tap OK.
When you end the meeting, the recording is processed. The email recipients receive a link to the recording when it is ready.
Sharing Content
The DTEN is capable of sharing content from any laptop or mobile device by using the Zoom Client. This can be used for displaying content (PDF’s, Word, PowerPoints) on the DTEN screen, as well as sharing that content with your meeting participants. The Zoom Client can be downloaded from https://zoom.us/download.
The steps for sharing content on the DTEN with the Zoom Client are:
Open the Zoom Client from your laptop or mobile device.
Select the Share Screen button.
Enter the Sharing Key and select Share. The Sharing Key can be found on the DTEN display, at the top right portion of the screen or after touching the Share Screen button.
Note: More details about the Zoom Client can be found in the Zoom Getting Started article, located in our Knowledge Base.
Whiteboarding
The DTEN is built with a large touchscreen monitor, which can also function as a digital whiteboard. This whiteboard can be used to illustrate ideas that can be saved and shared with your meeting participants. Touch the Whiteboard button on the DTEN display to get started.
Below is an image of the options available within the whiteboard, along with a short description of their function:
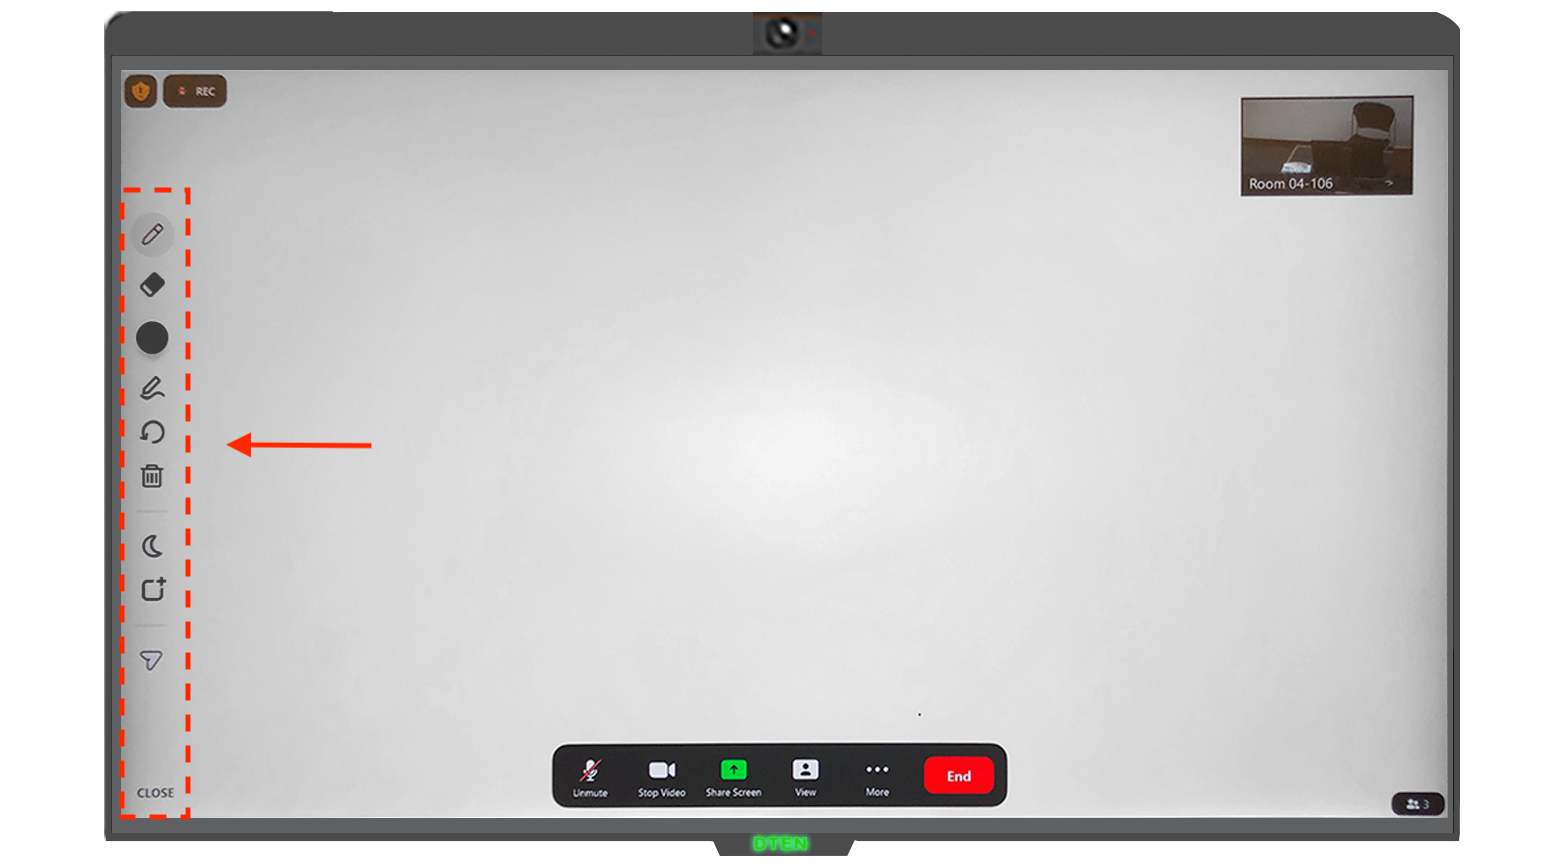
Close: Close the whiteboard and return to the home screen.
Moon Icon: Change the background of the whiteboard to black.
Save Icon: Email the whiteboard as an image.
Add Page Icon: Add a new whiteboard page. After adding a page, you will see an icon showing the number of pages. Tap the icon to see, view, and delete pages.
Drawing Tools: Colors (black, red, yellow, green, blue), eraser, pen, undo, and trash
New Share: Start screen sharing. You will be able to access the drawing tools after starting the screen share.
Start Meeting: Create a meeting and share the whiteboard with the participants.
Warning
Only use the DTEN pen or your fingers to draw on this monitor. Using other pens may not work correctly, and could scratch or damage the display. The DTEN pen will be in the conference room, or magnetically attach to the side of the DTEN display.
Contact Academic Technology
ATC Support Updates and Hours of Operation The ATC is closed to in-person assista...
ATC Support & Hours of Operation
Weekday Support, Monday - Friday
- Phone (voicemail only): 541-463-3377 (8am-5pm)
- Email: atc@lanecc.edu (8am-5pm)
- Book a virtual appointment with the ATC (Summer term)
The ATC is open to in-person assistance. Support is available through the above remote options and on campus at CEN 208