The DTen D7 unit comes equipped with Zoom Rooms already installed. Zoom Rooms is a software-based room system that provides an integrated experience for audio conferencing, wireless screen sharing, and video conferencing. This article covers:
- Powering on DTen D7 Unit
- Main Menu Buttons
- In-Meeting Controls
- Participants List Controls as the Host
- Sharing Content
- Whiteboarding
- Settings
- DTen / HyFlex Training Opportunities
Powering on DTen D7 Unit
To power on the DTen D7 unit, press the power button located at the bottom of the display on the back of the monitor.

Main Menu Buttons
Below is an image of what the Zoom Rooms software will look like, as well as descriptions for each button. When you power on your DTen, Zoom Rooms will automatically start up and present you with a home menu with the following options:
- New Meeting: Start an instant Zoom meeting. (Note: a random meeting ID will be generated, and users will need to be invited directly from the meeting via email address.)
- Join: Join a scheduled Zoom meeting by meeting ID (recommended)
- Whiteboard: (in-person only) Start a whiteboard session. See the Whiteboarding section for more details.
- Share Content: (in-person only) Start a screen-sharing session from another computer. More information about this can be found in the Sharing Content section.

In-Meeting Controls
Once in a Zoom meeting, touch anywhere on the screen to bring up the Meeting Controls on the bottom of the screen. Notice the following:
- Mute/Unmute: Mute or unmute the room's microphone.
- Start/Stop Video: Start or stop the room's video camera.
- Share Content: Display instructions to share content from your laptop or mobile device.
-
View: Change your video display layout to one of these options.
- Speaker: Display the video of the active speaker.
- Thumbnail: Display the video of the active speaker. All other attendees are displayed with thumbnails below the active speaker.
- Gallery: Display all attendees in a grid layout.
- Whiteboard: Start and share a whiteboard session.
- More: Opens a control panel with more controls.
- End/Leave: Leave or end the meeting

More
Tap More (three dots) to access additional in-meeting controls:

- Security: Manage participant access and enable/disable the waiting room.
- Manage Participants: View the meeting participants and access host tools.
- Start Recording: Begin recording the meeting to the Zoom cloud.
- Chat: Open or close the meeting chat window.
- Settings: Access room settings to test the microphone, speaker, and camera. Avoid changing other settings or signing out of the device.
- Volume slider: Adjust the room speaker volume.

Participants Panel
While in a meeting, tap More > Manage Participants to access host controls:

- Waiting: Admit participants from the waiting room.
- Tap the three dots next to a participant’s name for these options:
- Ask to Unmute / Mute: Request or force mute/unmute.
- Start/Stop Video: Enable or disable the participant's video.
- Pin: Pin the participant's video for the room display only.
- Spotlight for Everyone: Highlight the participant's video for all attendees.
- Make Host / Co-host: Transfer hosting or co-hosting privileges.
- Mute All: Mute all participants; the room microphone remains active.
- Tap More for these options:
- Lock Meeting: Prevent others from joining the meeting.
- Mute/Unmute on Entry: Automatically mute participants when they join.
- Disable Participants from Unmuting Themselves: Force mute control.
- Disable Renaming: Prevent participants from changing their display names.
- Disable Start Video: Stop participants from enabling their video.
- Show/Hide Non-video Participants: Show or hide names/profile pictures of participants with video off.
- Show/Hide Self-View: Show or hide the room's video feed on the display.
- Disable Waiting Room: Turn off the waiting room feature.

Sharing Content
The DTen allows content sharing from another computer, laptop, or mobile device using the Zoom Client. This feature lets you display documents such as PDFs, Word files, and PowerPoint presentations on the DTen screen and share them with meeting participants. You can download the Zoom Client at: https://zoom.us/download.
Steps to share content on the DTen:
- Open the Zoom Client on your computer, laptop, or mobile device.
- Note: More details about the Zoom Client can be found in the Zoom Getting Started article, located in our Knowledge Base.
- Select the Share Screen button.
- Enter the Sharing Key or Meeting ID and select Share Screen. This will share your screen and include your device’s audio.

- The Sharing Key appears on the DTen screen when you tap Share Content in the meeting controls.


Whiteboarding
The DTen touchscreen supports digital whiteboarding, which can be used during a Zoom meeting or as a stand-alone tool. Tap Whiteboard to begin.
Options available on the whiteboard:
- Drawing Tools: Choose from multiple colors, eraser, pen, undo, and trash to clear the board.
- Moon Icon: Change the background color of the whiteboard to black.
- Add Page Icon: Add new pages, view multiple pages, or delete them.
- Save Icon: Send the current whiteboard as an image via email.
- Close: Exit the whiteboard session and return to the home screen.
- Mute/Unmute: Mute or unmute the room’s microphone while whiteboarding.

Warning
Only use the DTen pen. Other pens may damage the display. The DTen pen will be in the conference room or magnetically attached to the side of the DTEN display.
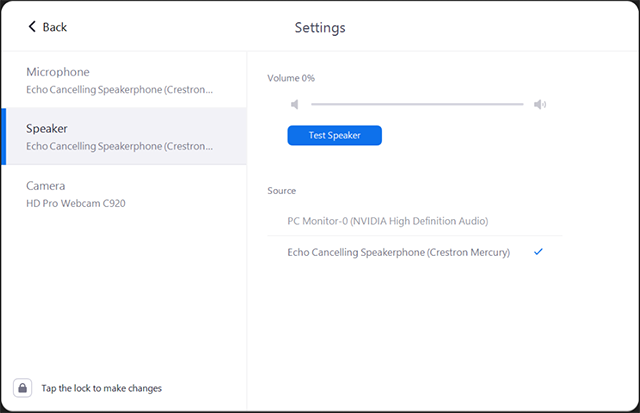
Settings
During a Zoom meeting, tap the More button (three dots) in the meeting controls and select Settings from the list. From the Settings menu, you can test the microphone, speaker, and camera to confirm they’re working correctly. Avoid changing any other settings.
Warning
Do not sign out of the device unless instructed by a Zoom administrator.
Microphone:
- Volume: Shows mic sensitivity
- Test Microphone: Playback your voice to confirm mic functionality
- Source: Tap to switch mic input

Speaker:
- Volume: Adjust via slider in meeting controls
- Test Speaker: Play a test tone to verify audio output
- Source: Tap to switch speaker output
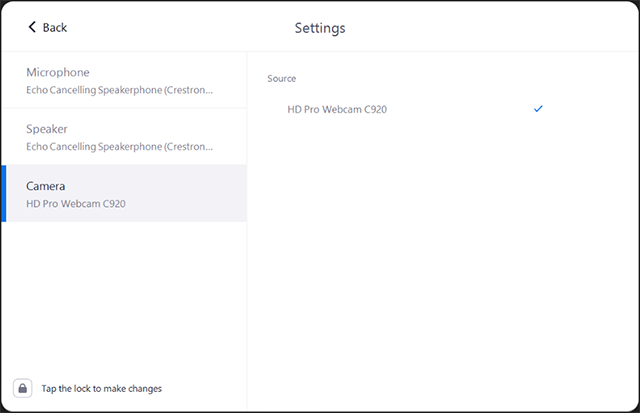
Camera:
- Preview / Test Camera: View the current video feed to confirm operation
- Source: Tap to switch camera
DTen / HyFlex Training Opportunities
The Academic Technology Center provides multiple options each term to support instructors using DTen systems for HyFlex teaching.
The following four training opportunities are available each term:
- DTen/Zoom Room Introduction Training Video - 23-minute recorded training (self-paced)
- DTen D7 Zoom Rooms User Guide - short recorded session or PDF guide (self-paced)
- Intro to DTen and HyFlex Classrooms - live virtual workshop available upon request (offered on various days/times)
- Hands-On DTen Practice Session - live in-person workshop available upon request (offered on various days/times)
Live sessions can be scheduled at a variety of days and times to accommodate instructor needs. To request a session or see upcoming dates, contact atc@lanecc.edu
Contact Academic Technology
ATC Support Updates and Hours of Operation The ATC is closed to in-person assista...
ATC Support & Hours of Operation
Weekday Support, Monday - Friday
- Phone (voicemail only): 541-463-3377 (8am-5pm)
- Email: atc@lanecc.edu (8am-5pm)
- Find our updated hours and support options on the ATC Website
The ATC is open to in-person assistance. Support is available through the above remote options and on campus at CEN 208